with thanksgiving coming this week, it will officially mark the end of fall for us! so what that the calender says that winter begins on december 21st?! after thanksgiving, it will be all christmas, all the time!!
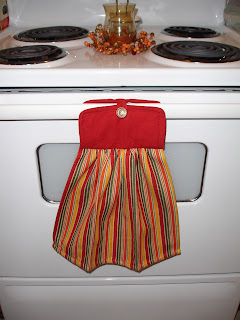
the last two projects for me(marie is already working on a christmas quilt for our mom--she's been done with "fall" since halloween!) are another autumn table runner and a dish towel/pot holder combo! since i already told you about a table runner last week, this week i'll show you how to make the "pot towel"? "towel holder"? hmmm, haven't really come up with a name for this one! lol anyhoo...
you will need:
one dish towel and one pot holder
pins
coordinating thread
button
needle
sewing machine
start by folding your towel in half(top to bottom) and rubbing with your finger to find the center(you can go ahead and press this, but i was too lazy to drag out the iron!)
use a basting stitch all the way down the center, following your mark--make sure that you leave some extra thread at the ends so that you can pull your gather!
now pull on the thread(from the bobbin) to make your gather. it needs to fit the width of your pot holder.
now turn your attention to the pot holder.
fold it in half(bottom to top) to find your button placement and to figure out where you will sew your towel. again, rub(or iron) to make a crease--this is where you will pin your towel.
pin your towel to the pot holder
using a zig zag stitch, sew down the entire length of your gather...back stitching a few times along the way for stability.
now sew your button on, and hang on your oven handle!
these are great for when you need to wipe your fingers quickly while you're cooking! i think they would make a great gift too!!
hope you all have a wonderful thanksgiving!!!
...now bring on the christmas fabric!!!
we are linking with:
skip to my lou
today's creative blog
creative itch
giggles glitz & glam
hope studios
Monday, November 22, 2010
Thursday, November 11, 2010
autumn table runner #1
i'm in love with the saltbox harvest fabric! i purchased a charm pack and decided that i needed a table runner(or two!). i have found that the missouri star quilt company has some of the best tutorials around. marie told me about the "quilt as you go" method, and i knew i needed to give it a try!
instead of using strips of fabric, i chose to sew three squares together.
after you have everything nice and trimmed, all you have to do is bind! this was such a quick and easy project to bust out in time for thanksgiving!
i'm almost finished with another one. its laid out a little differently than this one...and i went with regular quilting instead. i'll post it as soon as i'm finished!
we are linking up with:
skip to my lou
today's creative blog
hope studios
giggles glitz & glam
creative itch
Thursday, November 4, 2010
simple autumn valence
these little cuties are so simple to whip up! with cutting, pressing, sewing and hanging it only took about an hour and a half!(and if you don't stop to yack on the phone like i do...you could probably be done in an hour!!)
you'll need:
enough fabric for your window (i used 2 pieces...15 1/2" x 32" with deb strain's saltbox harvest)
sewing machine
iron/ironing board
thread
cut your pieces, then press 1/4" around all four sides.
stitch around all four sides using 1/8" seam allowance.
fold top piece down 2 1/2", press.
sew along the edge using 1/4" seam allowance. this will create your rod pocket.
press and hang!
made by you monday @ skip to my lou
today's creative blog
hope studios
creative itch
giggles, glitz and glam
saturday mornings
you'll need:
enough fabric for your window (i used 2 pieces...15 1/2" x 32" with deb strain's saltbox harvest)
sewing machine
iron/ironing board
thread
cut your pieces, then press 1/4" around all four sides.
stitch around all four sides using 1/8" seam allowance.
fold top piece down 2 1/2", press.
sew along the edge using 1/4" seam allowance. this will create your rod pocket.
press and hang!
perfect for autumn and thanksgiving!!
we are linking up with: made by you monday @ skip to my lou
today's creative blog
hope studios
creative itch
giggles, glitz and glam
saturday mornings
Monday, November 1, 2010
Last Minute Costume
A few days ago, my husband and I were invited to a Halloween party. I already had a costume picked out...I love Halloween, I dress up every year...party or NO party, lol. But Matt didn't really have anything in mind. So I went to Kmart and bought 2 cheap sweatshirts and came up with...a FLYING MONKEY! This process has probably been done for many a school play or dress up, but here's my process.
*Since it is a last minute thing, feel free to use tape, glue or staples to attach your components to the sweatshirt :o)
I bought one hoodie for Matt to wear and the other to cut out my pieces. Using a cardboard box (Matt also happens to be a Cheerios fiend, so we have plenty of boxes around the house), draw out whatever ear shape you want...make sure it's a little bigger than you want to allow for seams.
Pin right sides together and sew along edges. Leave open space to turn inside out.
Once you turn it out, run a stitch around the outer edge, about 1/4" to make the "fold" in the top of the ear.
Pin to hood of sweatshirt where you would like to attach them. Since it's a monkey, place on the sides. I used my walking foot and a zig zag stitch and sewed the crap out of these so they wouldn't fall off. The fabric is a bit thick, but I swear, you don't have to hand sew this. Again, feel free to glue or staple in place. Ears are done!
For the tail, I cut off the bottom band of the sweatshirt, folded it in half, long ways, right sides together and sewed it down one side. To turn it out is a huge pain, so I stopped half way, lol. BUT this worked to my advantage because it practically stuffed it's self!
It has a natural bend to it already! Unfortunately, I couldn't fit this under my walking foot and had to hand stitch to the bottom middle of hoodie.
For the wings, I had some old fabric on hand, used the other side of my handy Cheerios box and made a wing pattern, cut out, pinned and sewed together, just like with the ears. BUT, I sewed all the way around, no need to turn out, I just trimmed up the uneven edges.
Pin to back of hoodie, I just tacked them in place with a few stitches...again people, glue or staples. OR some of that fusible iron on stuff would probably work with the wings.
And Viola! A flying monkey is born!
Hubby is a good sport. Next year we'll try not to be so last minute, but I was pretty proud of this quickie costume! Hope you all had a happy Halloween!!!
Subscribe to:
Comments (Atom)


