
Thursday, June 23, 2011
friday night sew in
tomorrow night, i will be participating in the Friday Night Sew In ! click the link to find out what its all about!! sign up, sew something, and share it!!!
Monday, February 7, 2011
nana's napkin quilt
if its sentimental, i'm all over it! our great grandmother hand embroidered just about anything. napkins, pillow cases, tablecloths--you name it, it probably had a hand embroidered flower on it!! when she passed, our grandma got all of it. i can remember thanksgivings and easters with nana's tablecloths draped over everything!
when grandma passed, the linens got distributed amongst her daughters and granddaughters. i had more tablecloths and napkins than i knew what to do with! for the last 4 1/2 years they have been tucked away here and there around the house. occasionally i would pull something out-mostly just to smell grandma's fabric softener, but also to look at it and walk down memory lane for a bit. i miss her.
i didn't want them on a dark shelf anymore, they needed to be displayed...but in my own way. it hurt a little to cut them up...but it the end, i will have something that emily will be able to treasure and share with her daughter(s).
when i saw moda's dream on line, i knew it would be the perfect blend of vintage and lady like.
i purchased one dream on charm pack, one dream on jelly roll, and one bella solid jelly roll in snow.


 using nana's napkins, i cut 5x5 squares around the flowers, and using the dream on jelly roll, made a border around them.


when grandma passed, the linens got distributed amongst her daughters and granddaughters. i had more tablecloths and napkins than i knew what to do with! for the last 4 1/2 years they have been tucked away here and there around the house. occasionally i would pull something out-mostly just to smell grandma's fabric softener, but also to look at it and walk down memory lane for a bit. i miss her.
i didn't want them on a dark shelf anymore, they needed to be displayed...but in my own way. it hurt a little to cut them up...but it the end, i will have something that emily will be able to treasure and share with her daughter(s).
when i saw moda's dream on line, i knew it would be the perfect blend of vintage and lady like.
i purchased one dream on charm pack, one dream on jelly roll, and one bella solid jelly roll in snow.


next, i put borders around the charm squares using the snow jelly roll.
last night, i put the rows together. now i am pondering my next move. i haven't decided if i'm going to add anything in between the rows, or just sew them together and add a border. i'm going to play around tonight and see what i come up with.
i'm loving how its coming out though. i think nana and grandma would be proud!

Sunday, January 30, 2011
valentine's day mug rug
what a great beginner project! also a good way to use up those scraps!

four 5x5 squares
one 9 1/4 x 9 1/4 piece for backing
batting 9 1/4/ x 9 1/4
thread
iron
pins
heart template
*1/4" seam allowance unless otherwise noted
first you'll need to sew your squares together. press your seams.


since this is for valentine's day, i decided to quilt some hearts. using a piece of paper, cut out a heart that just fits the inside of your mug rug. trace, and sew. you can now use this first heart as a guide to make a few more hearts!(just line it up with your sewing foot and follow along!) TAKE YOUR TIME!! make as many as you'd like, or just "stitch the ditch" around the squares. when i was finished, some of the basting stitches from earlier were visible, so i just removed them with my seam ripper.
you're done!
need a gift for a teacher?? package with a cute mug(not my ugly rain forest cafe mug!! haha), and a little something sweet!


we are linking up with:
Thursday, January 27, 2011
Pin Cushions: Bringing Sisters Together!
Tina and I FINALLY had a day where we were able to get together and sew and we made these cute little pin cushions! Please go HERE to get the pattern and make one of your own! It is one of those instant gratification projects and great for beginners!
We printed and cut out the pattern:


And put all the pieces together!


As a added touch to go with her fabric, Tina whipped up these cute little cupcake pins!
 Now go make a pin cushion!

We printed and cut out the pattern:

We Pressed the fabric:

Sewed and pressed and cut some more:


And put all the pieces together!


Wednesday, January 12, 2011
Sweaters for your Pillows!
I LOVE the way these came out! I had some sweaters in my closet that I haven't worn in a long time, so I thought I would re-purpose them into covers for my icky couch pillows.
 My sweaters happen to have zippers on them, so this makes this tutorial even easier!

The first step is to flatten your sweater out and line up the seams. Then unzip about 1/4 of the way to make sure your zipper pull is UNDER where you will be cutting. Using a rotary cutter and straight edge, cut just under the arm pits, stopping at the zipper, I used some heavy duty scissors to cut through the zipper and then continued with the rotary cutter.

Next, turn inside out and take to your sewing machine. You can pin the edges if you want, I usually don't. It makes no difference if you sew the top or bottom first, but when you get to the bottom part of the zipper, STOP, back stitch and clip your thread. Then sew from the opposite end until you get to the bottom of the zipper again, back stitch. You won't be able to sew through this part so it is necessary to sew into the center from either side. I hope this makes sense! When you sew the top portion of the sweater, where you made the cut, just make sure when you get to the open zipper, you put them as close together as you can so that the zipper goes all the way up when we are finished.
Turn right side out through the unzipped hole you made at the beginning.

Now you can unzip all the way and stuff your pillow in! I was lucky enough to have pillows that fit perfectly, even a little tight, which I think looks nicer. Then I embellished with broaches (the zipper flower is from an etsy shop) and flowers I made with scraps, including a little lace from my wedding gown! You can easily find tutorials for fabric flowers just about anywhere. The best part is that I just used safety pins to attach them, so they can easily be removed when the covers need washing.

And TA DAA!!! Cute "new" pillows to help brighten up a BLAH winter day!!!

Today's Creative Blog
Hope Studios
Creative Itch
Little Eme


The first step is to flatten your sweater out and line up the seams. Then unzip about 1/4 of the way to make sure your zipper pull is UNDER where you will be cutting. Using a rotary cutter and straight edge, cut just under the arm pits, stopping at the zipper, I used some heavy duty scissors to cut through the zipper and then continued with the rotary cutter.

Next, turn inside out and take to your sewing machine. You can pin the edges if you want, I usually don't. It makes no difference if you sew the top or bottom first, but when you get to the bottom part of the zipper, STOP, back stitch and clip your thread. Then sew from the opposite end until you get to the bottom of the zipper again, back stitch. You won't be able to sew through this part so it is necessary to sew into the center from either side. I hope this makes sense! When you sew the top portion of the sweater, where you made the cut, just make sure when you get to the open zipper, you put them as close together as you can so that the zipper goes all the way up when we are finished.
Turn right side out through the unzipped hole you made at the beginning.

Now you can unzip all the way and stuff your pillow in! I was lucky enough to have pillows that fit perfectly, even a little tight, which I think looks nicer. Then I embellished with broaches (the zipper flower is from an etsy shop) and flowers I made with scraps, including a little lace from my wedding gown! You can easily find tutorials for fabric flowers just about anywhere. The best part is that I just used safety pins to attach them, so they can easily be removed when the covers need washing.

And TA DAA!!! Cute "new" pillows to help brighten up a BLAH winter day!!!
Hope Studios
Creative Itch
Little Eme
Monday, November 22, 2010
the last of the fall projects!
with thanksgiving coming this week, it will officially mark the end of fall for us! so what that the calender says that winter begins on december 21st?! after thanksgiving, it will be all christmas, all the time!!
the last two projects for me(marie is already working on a christmas quilt for our mom--she's been done with "fall" since halloween!) are another autumn table runner and a dish towel/pot holder combo! since i already told you about a table runner last week, this week i'll show you how to make the "pot towel"? "towel holder"? hmmm, haven't really come up with a name for this one! lol anyhoo...
you will need:
one dish towel and one pot holder
pins
coordinating thread
button
needle
sewing machine

start by folding your towel in half(top to bottom) and rubbing with your finger to find the center(you can go ahead and press this, but i was too lazy to drag out the iron!)
use a basting stitch all the way down the center, following your mark--make sure that you leave some extra thread at the ends so that you can pull your gather!
now pull on the thread(from the bobbin) to make your gather. it needs to fit the width of your pot holder.
 now turn your attention to the pot holder.
fold it in half(bottom to top) to find your button placement and to figure out where you will sew your towel. again, rub(or iron) to make a crease--this is where you will pin your towel.
pin your towel to the pot holder
 using a zig zag stitch, sew down the entire length of your gather...back stitching a few times along the way for stability.
now sew your button on, and hang on your oven handle!
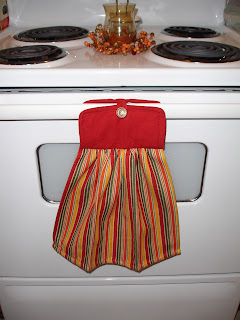
 these are great for when you need to wipe your fingers quickly while you're cooking! i think they would make a great gift too!!
hope you all have a wonderful thanksgiving!!!
...now bring on the christmas fabric!!!
we are linking with:
skip to my lou
today's creative blog
creative itch
giggles glitz & glam
hope studios
the last two projects for me(marie is already working on a christmas quilt for our mom--she's been done with "fall" since halloween!) are another autumn table runner and a dish towel/pot holder combo! since i already told you about a table runner last week, this week i'll show you how to make the "pot towel"? "towel holder"? hmmm, haven't really come up with a name for this one! lol anyhoo...
you will need:
one dish towel and one pot holder
pins
coordinating thread
button
needle
sewing machine

start by folding your towel in half(top to bottom) and rubbing with your finger to find the center(you can go ahead and press this, but i was too lazy to drag out the iron!)
use a basting stitch all the way down the center, following your mark--make sure that you leave some extra thread at the ends so that you can pull your gather!
now pull on the thread(from the bobbin) to make your gather. it needs to fit the width of your pot holder.

fold it in half(bottom to top) to find your button placement and to figure out where you will sew your towel. again, rub(or iron) to make a crease--this is where you will pin your towel.
pin your towel to the pot holder

now sew your button on, and hang on your oven handle!


hope you all have a wonderful thanksgiving!!!
...now bring on the christmas fabric!!!
we are linking with:
skip to my lou
today's creative blog
creative itch
giggles glitz & glam
hope studios
Thursday, November 11, 2010
autumn table runner #1

instead of using strips of fabric, i chose to sew three squares together.


we are linking up with:
skip to my lou
today's creative blog
hope studios
giggles glitz & glam
creative itch
Subscribe to:
Posts (Atom)